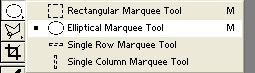
2).- Now your canvas should look as below:
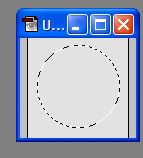
3).- Next make a new layer with the circle still on the canvas. After you make a new layer, fill the cirle with the color of your choosing.
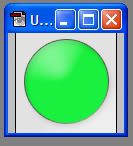
4).- First **** on Bevel and Emboss. Bevel and Emboss Settings
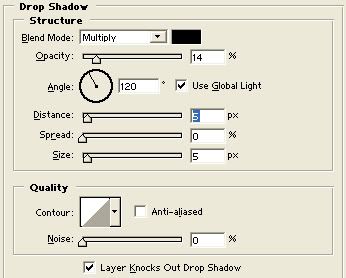
5).- Next go to Drop Shadow and set it to these settings. Drop Shadow Settings
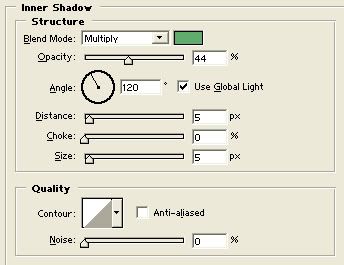
6).- The do the Inner Shadow. NOTE: PUT THHE INNER SHADOW COLOR THE SAME COLOR OF YOUR ORB BUT DARKER. Inner Shadow Settings
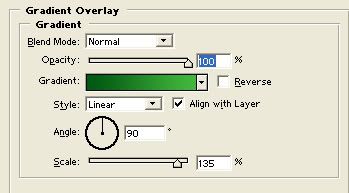
7).- Now ajust the Gradient overlay. NOTE: FIRST OVERLAY COLOR SHOULD BE SAME SHADE BUT DARKER THEN ORB AND SECOND OVERLAY COLOR SHOULD BE SAME COLOR AS ORB Gradient Overlay Settings
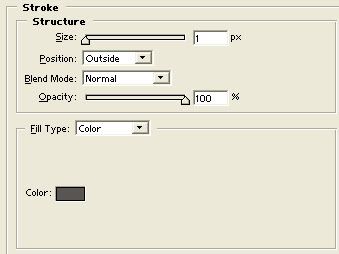
8).- Lastly ajust the Stoke. (The color should be dark grey) Stoke Settings
Now your Orb should look as below:
PS- This Orb looks better the small the orb is and to add a better affect, Hold Ctrl and left **** on the orb layer. Then make a new layer (Shift+Ctrl+Alt+N) and go to Select ->Modify -> Expand. For this size orb I made, enter the number 2 and **** OK. Next Fill the section with you background color. Then right **** on the layer you are using and **** blending options. Go to gradient affect and **** the checkbox. Then adjust the gradient affect to match your background and check the reverse box ann your finished.

